
Software Factory
AWS Cloudformation – Partie 5 [Anglais]
12 Août 2019
par
Olivier Robert
We have splitted the infrastructure components in different stacks in part 4. Now we’ll deploy an nginx to (simulate an app). But before we do so. Let’s chat about it.
At this stage, the nginx will live in the private host (the EC2 in the private subnet). If, for whatever reason, that instance goes down, the nginx is gone.
It would be better if we could have some resilience. We could deploy 2 instances and load balance them. Sure! That would add some resilience. We could also use an AWS Auto Scaling group and have it take care of whatever might happen to the instances we launch (1 or 2 or more). If we distribute the instances in different availability zones, that would give us even more resilience. What are the chances for 2 availability zones to go bust at the same time? I don't know actually. But I guess it's pretty slim.
The Auto Scaling group can be configured to always keep a specific number of instances up and running. It can be configured to scale up or down according to metrics thresholds. A load balancer can be configured to automatically distribute traffic to an Auto Scaling group. I don't want to go to deep into the details here because the stack configuration will show it all, but know that we are going to use Availability Zones, an Auto Scaling group and an application Load Balancer to get a good level of resilience. Elasticity will follow in Part 6.
Before you start playing with the automation, I suggest you read up on Auto Scaling and you get to the end of Part 4. Check out tag part4.3 in the Github repository if you have not done the steps to reach our current starting point.
First we need to create a Launch Configuration which is the template for our instance. The Auto Scaling group is going to use it to launch one or more EC2 instances.
It's not that different from the EC2 setup we had in Part 4. We added the UserData section to install and start nginx when the EC2 instance boots up.
For the Auto Scaling group, we specify:
- In which subnets instances are to be launched
- How many instances we want launched
- The minimum and maximum number of instances at any time
- The Launch Configuration to use
- The update policy: here if we update,a new Auto Scaling group is created, and when it is ready, the previous Auto Scaling group is removed
I suggest you follow using the Github repository as I will only refer to snippets from now on. Check out part5.1. Copy the app.yaml file to your S3 bucket and use the new master.yaml to update Cloudformation.
Here is the new Resources section:
[...]
Resources:
  PrivateHostSecurityGroup:
    Type: 'AWS::EC2::SecurityGroup'
    Properties:
      VpcId: !Ref VPCID
      GroupDescription: Enable SSH access via port 22
      SecurityGroupIngress:
        - IpProtocol: tcp
          FromPort: '22'
          ToPort: '22'
          SourceSecurityGroupId: !Ref BastionSecurityGroup
      Tags:
        - Key: Name
          Value: ProjectXPrivateHostSG

  DeployAppLaunchConfig:
    Type: AWS::AutoScaling::LaunchConfiguration
    Properties:
      ImageId: ami-0ff760d16d9497662
      InstanceType: t2.micro
      KeyName: !Ref KeyPairName
      SecurityGroups:
        - !Ref PrivateHostSecurityGroup
      UserData:
        Fn::Base64:
          Fn::Sub: |
            #!/bin/bash -xe
            # Add EPEL repository
            yum install epel-release
            # Install Nginx
            yum install nginx
            # Enable and start service
            systemctl enable nginx
            systemctl start nginx

  DeployAppASG:
    Type: AWS::AutoScaling::AutoScalingGroup
    Properties:
      VPCZoneIdentifier:
        - !Ref PrivateSubnet1Id
        - !Ref PrivateSubnet2Id
        - !Ref PrivateSubnet3Id
      DesiredCapacity: 1
      LaunchConfigurationName: !Ref DeployAppLaunchConfig
      MaxSize: 2
      MinSize: 1
      Tags:
          - Key: Name
            Value: ProjectXASG
            PropagateAtLaunch: True
    UpdatePolicy:
      AutoScalingReplacingUpdate:
        WillReplace: True
Once the update is complete, the previous private host EC2 instance has been terminated and a new Auto Scaling group is live with exactly one instance.
Let's verify we have an nginx running in our private host. And you will notice, ... that failed. We will have to debug this. Luckily, the /var/log/cloud-init.log file is going to tell us what's wrong.
2019-08-08 09:19:38,192 - util.py[DEBUG]: Running command ['/var/lib/cloud/instance/scripts/part-001'] with allowed return codes [0] (shell=False, capture=False)
2019-08-08 09:19:43,559 - util.py[WARNING]: Failed running /var/lib/cloud/instance/scripts/part-001 [1]
2019-08-08 09:19:43,559 - util.py[DEBUG]: Failed running /var/lib/cloud/instance/scripts/part-001 [1]
Traceback (most recent call last):
  File "/usr/lib/python2.7/site-packages/cloudinit/util.py", line 802, in runparts
    subp(prefix + [exe_path], capture=False)
  File "/usr/lib/python2.7/site-packages/cloudinit/util.py", line 1958, in subp
    cmd=args)
ProcessExecutionError: Unexpected error while running command.
Command: ['/var/lib/cloud/instance/scripts/part-001']
Exit code: 1
Reason: -
Stdout: -
Stderr: -
2019-08-08 09:19:43,582 - cc_scripts_user.py[WARNING]: Failed to run module scripts-user (scripts in /var/lib/cloud/instance/scripts)
2019-08-08 09:19:43,583 - handlers.py[DEBUG]: finish: modules-final/config-scripts-user: FAIL: running config-scripts-user with frequency once-per-instance
2019-08-08 09:19:43,583 - util.py[WARNING]: Running module scripts-user (<module 'cloudinit.config.cc_scripts_user' from '/usr/lib/python2.7/site-packages/cloudinit/config/cc_scripts_user.pyc'>) failed
2019-08-08 09:19:43,583 - util.py[DEBUG]: Running module scripts-user (<module 'cloudinit.config.cc_scripts_user' from '/usr/lib/python2.7/site-packages/cloudinit/config/cc_scripts_user.pyc'>) failed
Traceback (most recent call last):
  File "/usr/lib/python2.7/site-packages/cloudinit/stages.py", line 793, in _run_modules
    freq=freq)
  File "/usr/lib/python2.7/site-packages/cloudinit/cloud.py", line 54, in run
    return self._runners.run(name, functor, args, freq, clear_on_fail)
  File "/usr/lib/python2.7/site-packages/cloudinit/helpers.py", line 187, in run
    results = functor(*args)
  File "/usr/lib/python2.7/site-packages/cloudinit/config/cc_scripts_user.py", line 45, in handle
    util.runparts(runparts_path)
  File "/usr/lib/python2.7/site-packages/cloudinit/util.py", line 809, in runparts
    % (len(failed), len(attempted)))
RuntimeError: Runparts: 1 failures in 1 attempted commands
Our userdata script /var/lib/cloud/instance/scripts/part-001 does not execute correctly. It does for good reason. We install the EPEL package and the nginx interactively. The command waits for us to say: 'y', yes, do it!
We need to modify the userdata script to install packages non interactively.
yum install -y epel-release
yum install -y nginx
Re-upload the app.yaml file to S3 and update the master stack on Cloudformation with the same master file ("Use current template").
Quick check on the private host to make sure the change is working as expected.
[root@ip-10-0-12-219 ~]# ps -ef | grep nginx
root      4299     1  0 10:05 ?        00:00:00 nginx: master process /usr/sbin/nginx
nginx     4300  4299  0 10:05 ?        00:00:00 nginx: worker process
root      4324  4212  0 10:06 pts/0    00:00:00 grep --color=auto nginx
[root@ip-10-0-12-219 ~]# curl -I localhost
HTTP/1.1 200 OK
Server: nginx/1.12.2
Date: Thu, 08 Aug 2019 10:06:46 GMT
Content-Type: text/html
Content-Length: 3700
Last-Modified: Fri, 10 May 2019 08:08:40 GMT
Connection: keep-alive
ETag: "5cd53188-e74"
Accept-Ranges: bytes
The devil is in the details. I hope you did try to debug this with me. Rest assured you will get in trouble. This is tag part5.2 for the lazy guys in the back of the room 😉
What we need to do now is expose our "app" to the outside world via an AWS Application load balancer.
Without knowing anything about load balancers, I know one thing for sure. I will need a security group.
  ALBSecurityGroup:
    Type: 'AWS::EC2::SecurityGroup'
    Properties:
      VpcId: !Ref VPC
      GroupDescription: Enable HTTP/HTTPS access
      SecurityGroupIngress:
        - IpProtocol: 'tcp'
          FromPort: '80'
          ToPort: '80'
          CidrIp: !Ref ALBAccessCIDR
        - IpProtocol: 'tcp'
          FromPort: '443'
          ToPort: '443'
          CidrIp: !Ref ALBAccessCIDR
      Tags:
        - Key: Name
          Value: ProjectXALBSG
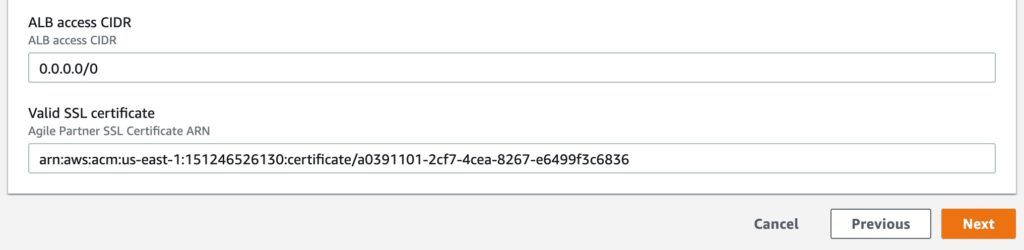
I can limit access with a CIDR and introduce a new parameter: ALBAccessCIDR. I will set the default value to 0.0.0.0/0 (the entire world). I have already added port 443 for TLS later down the road.
We will use an application load balancer, a listener (on . port 80) and a target group.
The listener from the loadbalancer will forward incoming requests (on port 80) to a target group (on port 80) which is linked to the Auto Scaling group, and thus to our instance(s).
+---------------+     +-------------+    +----------------+     +--------------+
|               |     |             |    |                |     |              |
| Load Balancer +---->+   Listener  +--->+   Target group +---->+  Instance(s) |
|               |     |             |    |                |     |              |
+---------------+     +-------------+    +----------------+     +--------------+
Here is how the Target group is linked to the Auto Scaling group.
  TargetGroupARNs:
    - !Ref WebAppTargetGroup
And here are the ALB resources.
  ALBSecurityGroup:
    Type: 'AWS::EC2::SecurityGroup'
    Properties:
      VpcId: !Ref VPCID
      GroupDescription: Enable HTTP/HTTPS access
      SecurityGroupIngress:
        - IpProtocol: 'tcp'
          FromPort: '80'
          ToPort: '80'
          CidrIp: !Ref ALBAccessCIDR
        - IpProtocol: 'tcp'
          FromPort: '443'
          ToPort: '443'
          CidrIp: !Ref ALBAccessCIDR
      Tags:
        - Key: Name
          Value: ProjectXALBSG

  WebAppALB:
    Type: AWS::ElasticLoadBalancingV2::LoadBalancer
    Properties:
      IpAddressType: ipv4
      Scheme: internet-facing
      SecurityGroups:
        - !Ref ALBSecurityGroup
      Subnets:
        - !Ref PublicSubnet1Id
        - !Ref PublicSubnet2Id
        - !Ref PublicSubnet3Id
      Tags:
        - Key: Name
          Value: ProjectXALB
      Type: application

  Listener:
    Type: AWS::ElasticLoadBalancingV2::Listener
    Properties:
      DefaultActions:
        - Type: forward
          TargetGroupArn:
            Ref: WebAppTargetGroup
      LoadBalancerArn:
        Ref: WebAppALB
      Port: '80'
      Protocol: HTTP

  WebAppTargetGroup:
    Type: AWS::ElasticLoadBalancingV2::TargetGroup
    Properties:
      Port: '80'
      Protocol: 'HTTP'
      VpcId: !Ref VPCID
      HealthCheckIntervalSeconds: 30
      HealthCheckPath: /
      HealthCheckPort: 80
      HealthCheckProtocol: HTTP
      HealthCheckTimeoutSeconds: 5
      HealthyThresholdCount: 2
      Tags:
        - Key: Name
          Value: ProjectXWebAppTG

Outputs:
  ProjectXALBDNS:
    Description: Web App ALB DNS Name
    Value:
      Fn::Join:
        - ''
        - - "https://"
          - Fn::GetAtt: WebAppALB.DNSName
We need to integrate the ALBAccessCIDR parameter in the master.yaml file.
And we need to change our private host security group to accept connections from the load balancer on port 80 (and 443 later).
  PrivateHostSecurityGroup:
    Type: 'AWS::EC2::SecurityGroup'
    Properties:
      VpcId: !Ref VPCID
      GroupDescription: Enable SSH access via port 22
      SecurityGroupIngress:
        - IpProtocol: tcp
          FromPort: '22'
          ToPort: '22'
          SourceSecurityGroupId: !Ref BastionSecurityGroup
        - IpProtocol: tcp
          FromPort: '80'
          ToPort: '80'
          SourceSecurityGroupId: !Ref ALBSecurityGroup
      Tags:
        - Key: Name
          Value: ProjectXPrivateHostSG
Now we can upload our modified app.yaml file to the S3 bucket and update the master stack (Replace current template).
In the app stack Outputs, we have the DNS of the load balancer. We can test the connection.
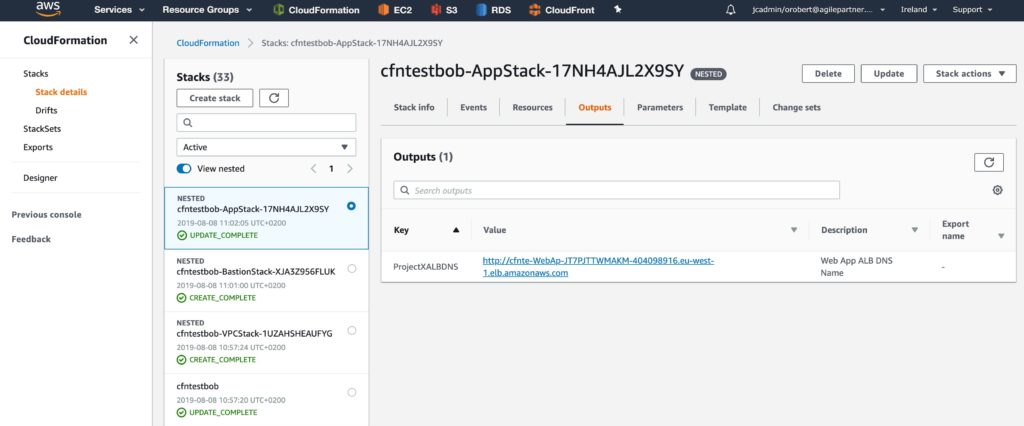
We can see as well that the target group we created has one healthy instance from the Auto Scaling group.

Who puts an app out on plain HTTP today? Nobody! We won't either. We will add a secure listener, a secure listerner certificate, and secure target group. When we are done, we will have an end to end secured connection.
But we need to change the nginx configuration as well. Right now, it's bare bones, we need to, at least, add a vhost for plain and secure hostname based connections.
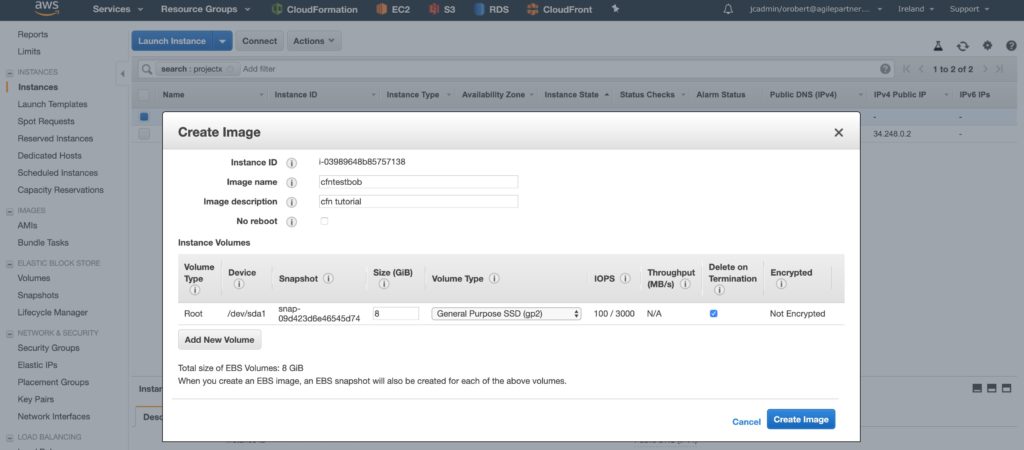
At this stage, we can switch to a pre-baked AMI. This will liberate us to script and install everything for each new instance the Auto Scaling group would launch for us. To prepare the new AMI, ssh into the private host and add the following nginx configuration.
➜ ssh -A centos@34.248.0.2
Last login: Thu Aug  8 10:47:06 2019 from 194.154.207.138
[centos@ip-10-0-1-94 ~]$ ssh centos@10.0.12.219
Last login: Thu Aug  8 10:47:09 2019 from ip-10-0-1-94.eu-west-1.compute.internal
[centos@ip-10-0-12-219 ~]$ sudo su -
Last login: Thu Aug  8 10:05:46 UTC 2019 on pts/0
[root@ip-10-0-12-219 ~]# cd /etc/nginx/conf.d/
[root@ip-10-0-12-219 ~]# vi cfntestbob.conf
server {
   listen       80;
   listen       [::]:80;
   server_name  cfntestbob.agilepartner.net;
   root         /usr/share/nginx/html;

   # Load configuration files for the default server block.
   include /etc/nginx/default.d/*.conf;

   return 301 https://$host$request_uri;
}

server {
   listen       443 ssl http2;
   listen       [::]:443 ssl http2;
   server_name  cfntestbob.agilepartner.net;
   root         /usr/share/nginx/html;

   ssl_certificate "/etc/pki/nginx/ssl-bundle.crt";
   ssl_certificate_key "/etc/pki/nginx/private/private.key.pem";
   ssl_session_cache shared:SSL:1m;
   ssl_session_timeout  10m;
   ssl_ciphers HIGH:!aNULL:!MD5;
   ssl_prefer_server_ciphers on;

   # Load configuration files for the default server block.
   include /etc/nginx/default.d/*.conf;


   location / {
   }

   error_page 404 /404.html;
      location = /40x.html {
   }

   error_page 500 502 503 504 /50x.html;
      location = /50x.html {
   }
 }
Of course adapt the nginx configuration with you server name ,upload and replace the certificate and the private key with yours.
Create an AMI in the AWS EC2 console.

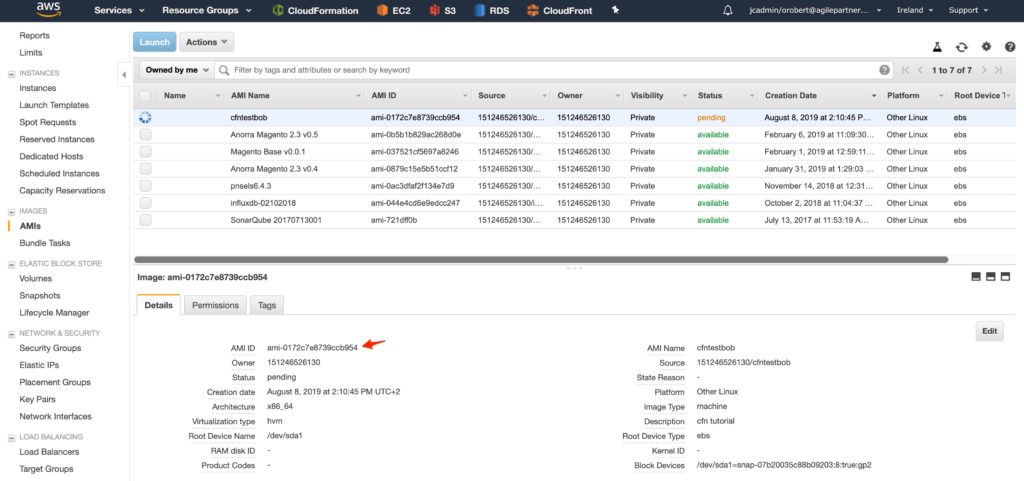
Get the image ID
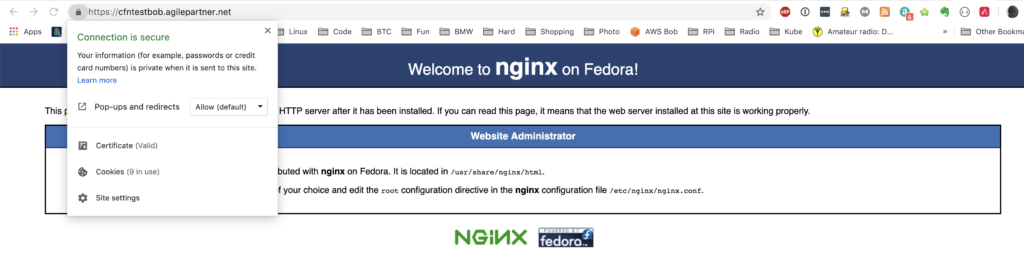
You will need a certificate: if you don't have one, you can create one for free with LetsEncrypt. Google it, it's very easy. I suggest using a docker container. Use whatever DNS name you want. I'm going for cfntestbob.agilepartner.net. You could use a DNS server and create a CNAME to the load balancer but I am just going to change my local /etc/hosts and use one of the load balancer's IP to verify things are working. This is just to keep it in the realm of what you could do at home.
Replace the image ID of the Centos 7 AMI with your pre-baked AMI ID in the app.yaml file. And remove the userdata part we don't need anymore.
Update the private host security group to allow connections from the load balancer on port 443 and add the secure web app target group to the Auto Scaling group or the target group will have no targets.
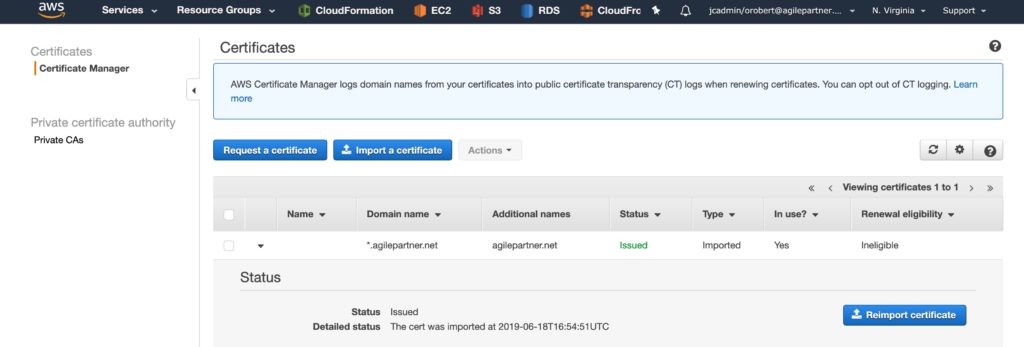
We need the certificate in 2 places: the private host (it's already baked in our AMI) and the load balancer. Upload your certificate to ACM in the region you are currently using. We can then link the certificate to the load balancer with its ARN.
We need a certificate parameter in both the master.yml and the app.yaml file.
And we are ready to test. Checkout tag part5.4 if you want to verify your work or if you want to give it a run.
Note that we use the imported certificate ARN to update the parameter during the master stack update.
Time to test the end to end TLS connection.
We need to find an IP of the load balancer. Use the load balancer DNS name.
➜ dig cfnte-webap-jt7pjttwmakm-404098916.eu-west-1.elb.amazonaws.com

; <<>> DiG 9.10.6 <<>> cfnte-webap-jt7pjttwmakm-404098916.eu-west-1.elb.amazonaws.com
;; global options: +cmd
;; Got answer:
;; ->>HEADER<<- opcode: QUERY, status: NOERROR, id: 19647
;; flags: qr rd ra; QUERY: 1, ANSWER: 3, AUTHORITY: 0, ADDITIONAL: 1

;; OPT PSEUDOSECTION:
; EDNS: version: 0, flags:; udp: 4096
;; QUESTION SECTION:
;cfnte-webap-jt7pjttwmakm-404098916.eu-west-1.elb.amazonaws.com.        IN A

;; ANSWER SECTION:
cfnte-webap-jt7pjttwmakm-404098916.eu-west-1.elb.amazonaws.com. 60 IN A 52.211.141.243
cfnte-webap-jt7pjttwmakm-404098916.eu-west-1.elb.amazonaws.com. 60 IN A 54.76.100.232
cfnte-webap-jt7pjttwmakm-404098916.eu-west-1.elb.amazonaws.com. 60 IN A 99.80.208.33

;; Query time: 71 msec
;; SERVER: 208.67.222.222#53(208.67.222.222)
;; WHEN: Thu Aug 08 15:26:56 CEST 2019
;; MSG SIZE  rcvd: 139
Use one of the IPs and put it in your /etc/hosts with your chose DNS name.
52.211.141.243 cfntestbob.agilepartner.net
Check out tag part5.4 to reach this point in the tutorial.
Join me in Part 6 where we do a few little adjustments for the final.
Articles similaires

La vie chez AP
Software Factory
Portrait en mode interview de l’un de nos Full Stack Developer, Florian. Depuis 2020 au sein d’Agile Partner, il accompagne nos clients dans l’élaboration de…
Lire l’article
Be Agile
Craftsmanship
Software Factory
Transformation Digitale
Vous évoluez dans un univers où la maîtrise de la gestion de projet / produit / équipe est primordiale ? Et où les compétences techniques…
Lire l’article